Select
Last Updated: May 4, 2022
To select imagery to view or order, you can:
-
Define your Area of Interest (AOI)
-
Choose criteria for filtering results
-
Click "select" to see results
Define your AOI
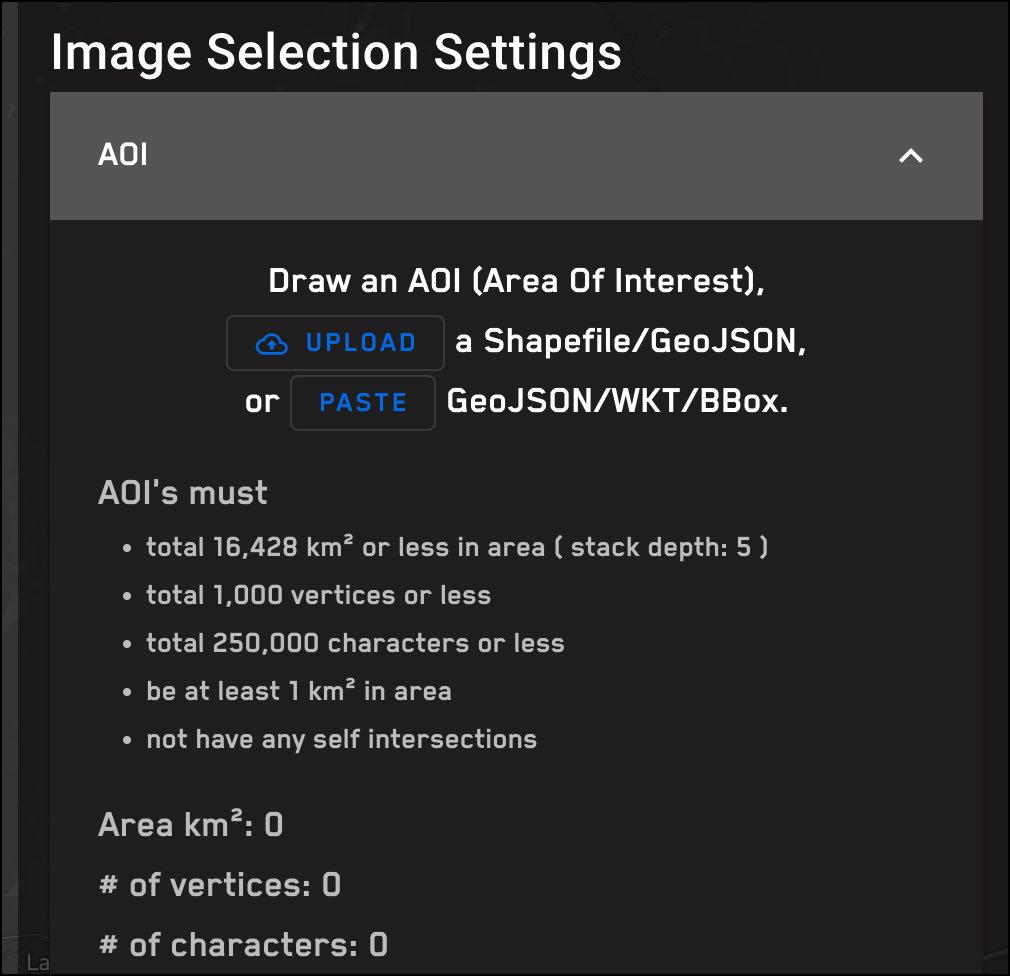
An AOI is required for imagery selection. You can define the area of interest to search in by drawing boundaries on the map, uploading a file, or pasting a geometry into the AOI field. To learn more about these options and see validation rules for an AOI, see Define your AOI.
Choose filtering criteria
Set temporal criteria using "date options"
To filter selection results by temporal criteria, click the "Date Options" menu and select from one of the following options:
-
Image Age Category
-
Seasonal
-
Start and end date
From the ARD Dashboard interface, you can only select one date option. If you have a more complex query that requires two or more date options in your request, you can construct a request with all options using the ARD SDK or the Postman Collection.
Image age category
To filter for imagery by image age category, from the "Date Options" menu, choose "Image Age Category". This is the default selection, so it may already be displayed in your view.
-
Click Image Age Category
-
Click the box next to the category you want to filter by. You can choose more than one.
Maxar ARD subscriptions include separate pricing for each imagery age category. Depending on your subscription, your account may have ordering limits based on the category.
To see pricing and fee limits for your account, click the three vertical dots next to your username in the top right corner of the dashboard, then choose "my account".
| Image Age Category | Time Since Acquisition |
|---|---|
| Fresh imagery | less than or equal to 90 days |
| Standard imagery | 91 days to 3 years |
| Training imagery | more than 3 years |
Seasonal
The Seasonal date option offers several ways to filter for imagery by seasons. Because seasons vary by location, the seasonal query uses months and days to give more flexibility in constructing a seasonal filter.
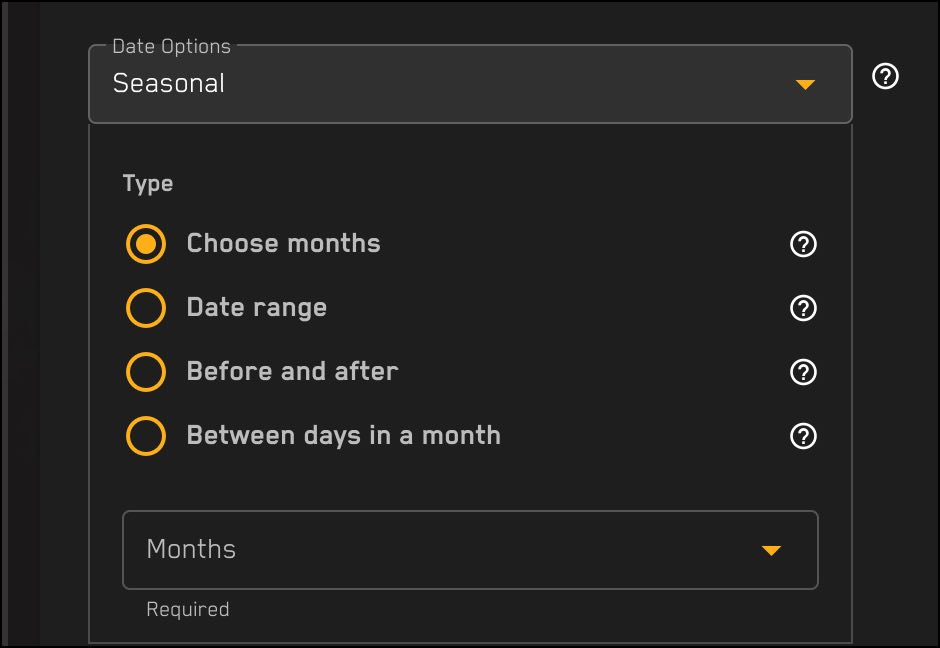
When you click an option in the seasonal menu, the input options change with it.
-
The "choose months" input form brings up a list of months with checkboxes. Click the checkbox next to the month or months to filter by.
-
The "date range" input form lets you create a range of months by choosing a start month and an end month. The start month must be before the end month.
-
The "before and after" option lets you search for everything before one month and after another month.
-
The "between days in a month" input form lets you specify a range of days. For example, you can filter for imagery capture on days 1-5 of each month of the year.
*Note: To create a seasonal search for a range that starts at the end of one year and ends at the beginning of the next year, use the "choose months" option.
Start and end date
Search for imagery by a date range by selecting a start date and an end date. The input form requires the date in mm/dd/yyyy format.
Metadata filters
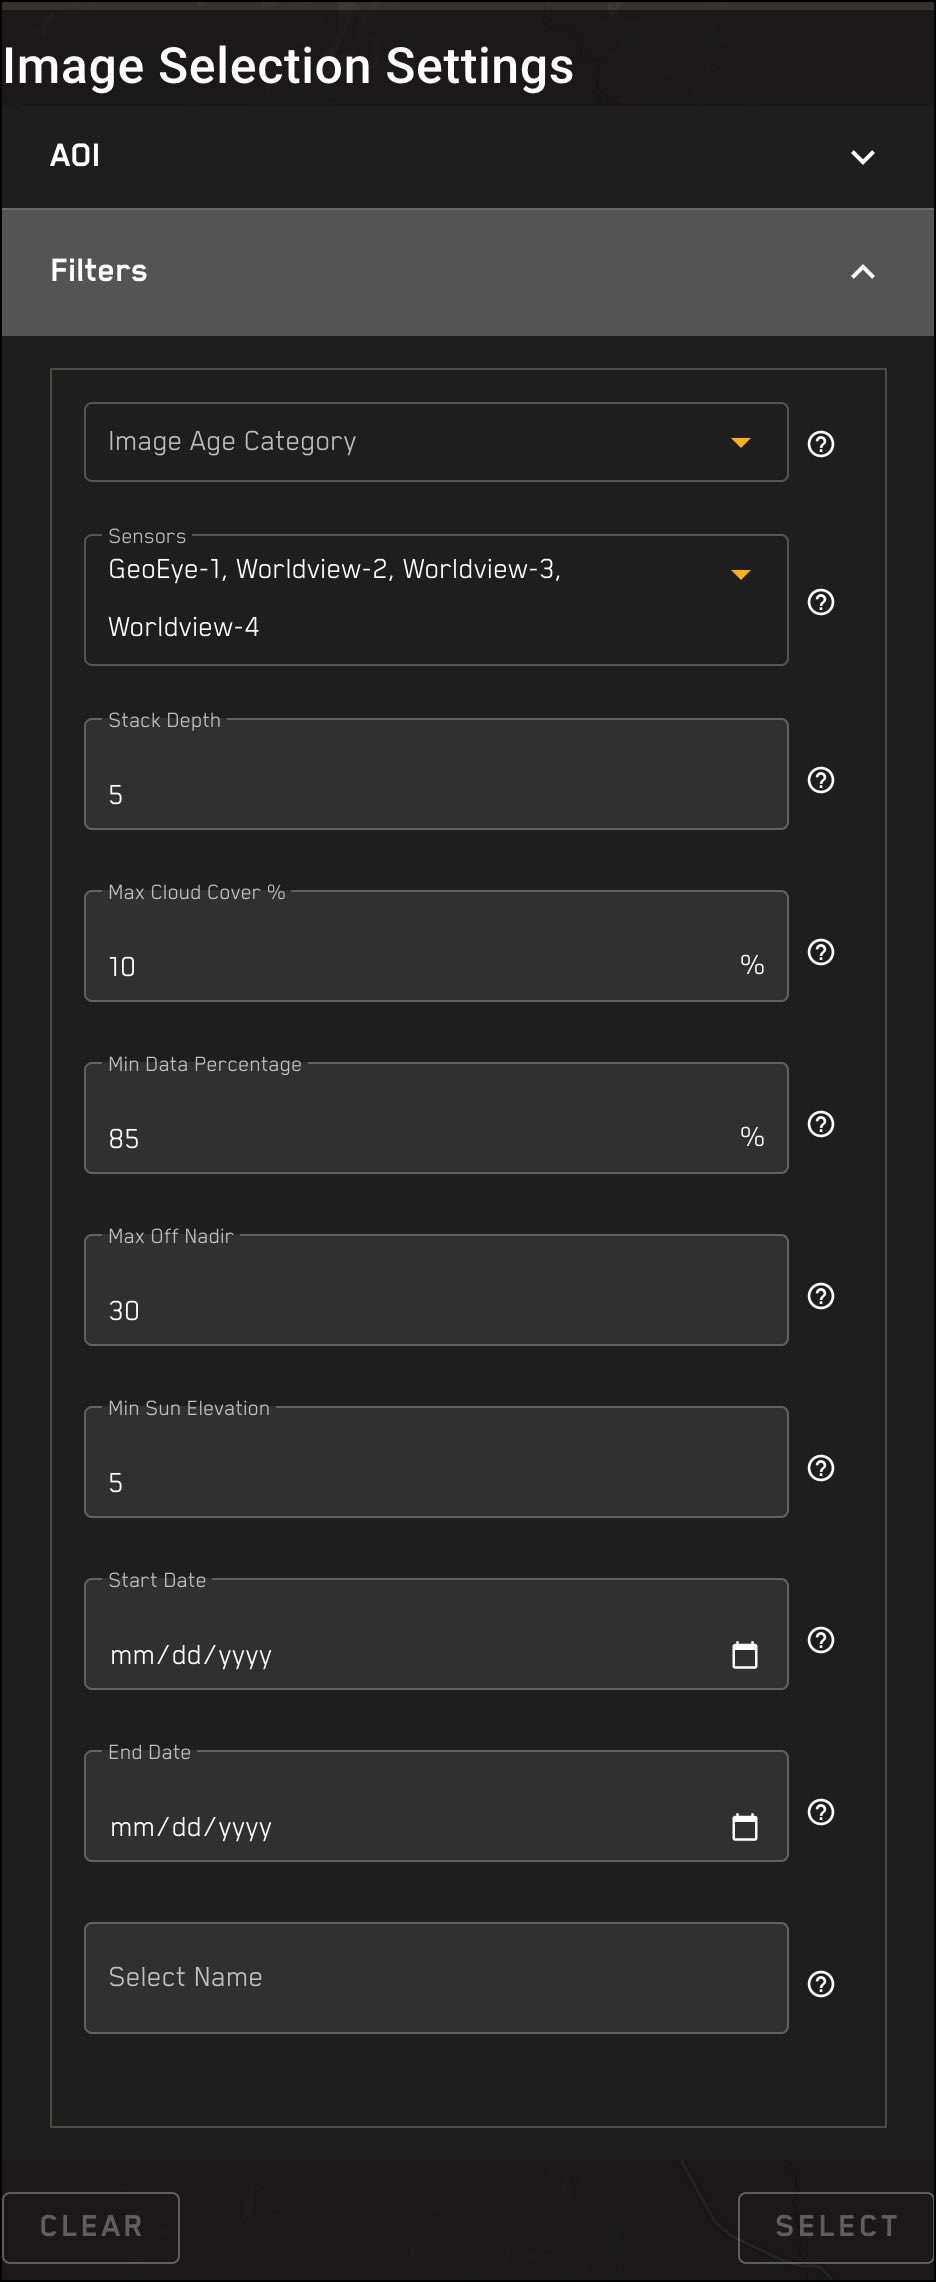
You can further filter your selection results by setting values for the fields listed in the form. All filters are optional.
| field | description | default value |
|---|---|---|
| Sensors | Search for imagery by one or more satellite sensors. | WorldView-2, WorldView-3, WorldView-4, GeoEye-1 |
| Stack Depth | The number of tiles to select from a cell. Tiles will be selected from most recent to oldest. | 5 |
| Max Cloud Cover % | Select imagery with no more than the maximum percentage of cloud cover. | 10 |
| Min Data Percentage | The minimum percentage of the cell area that is covered by imagery. | 85 |
| Max Off Nadir | Select imagery with no more than the maximum off nadir angle. If you're running BBA on an order, only select imagery with an off-nadir angle of 30 or less. | less than or equal to 30 |
| Sun Elevation | Select imagery with a sun elevation equal to or more than the minimum sun elevation. Imagery with a sun elevation of less than 5 can't be ordered as ARD. | 5 |
| Select Name | Assign a name to the imagery selection so you can identify it for later use. | no default |
Satellites
ARD can be ordered from Maxar's WorldView-1, WorldView-2, WorldView-3 (VNIR), WorldView-4, and GeoEye-1 satellites. If no sensor values are submitted, WorldView-2, WorldView-3, WorldView-4, GeoEye-1 imagery will be included. WorldView-1 is not included in an order delivery by default; it must be explicitly requested.
Name your selection
When you set choose your selection criteria, you can give the selection a name. This makes it easy to identify the selection later if you want to re-run it. Selections without names expire in 90 days. Named selections never expire.
View Selection: Tile View
Click the "Select" button at the bottom of the image selection screen to view details about the imagery discovered by your selection criteria.
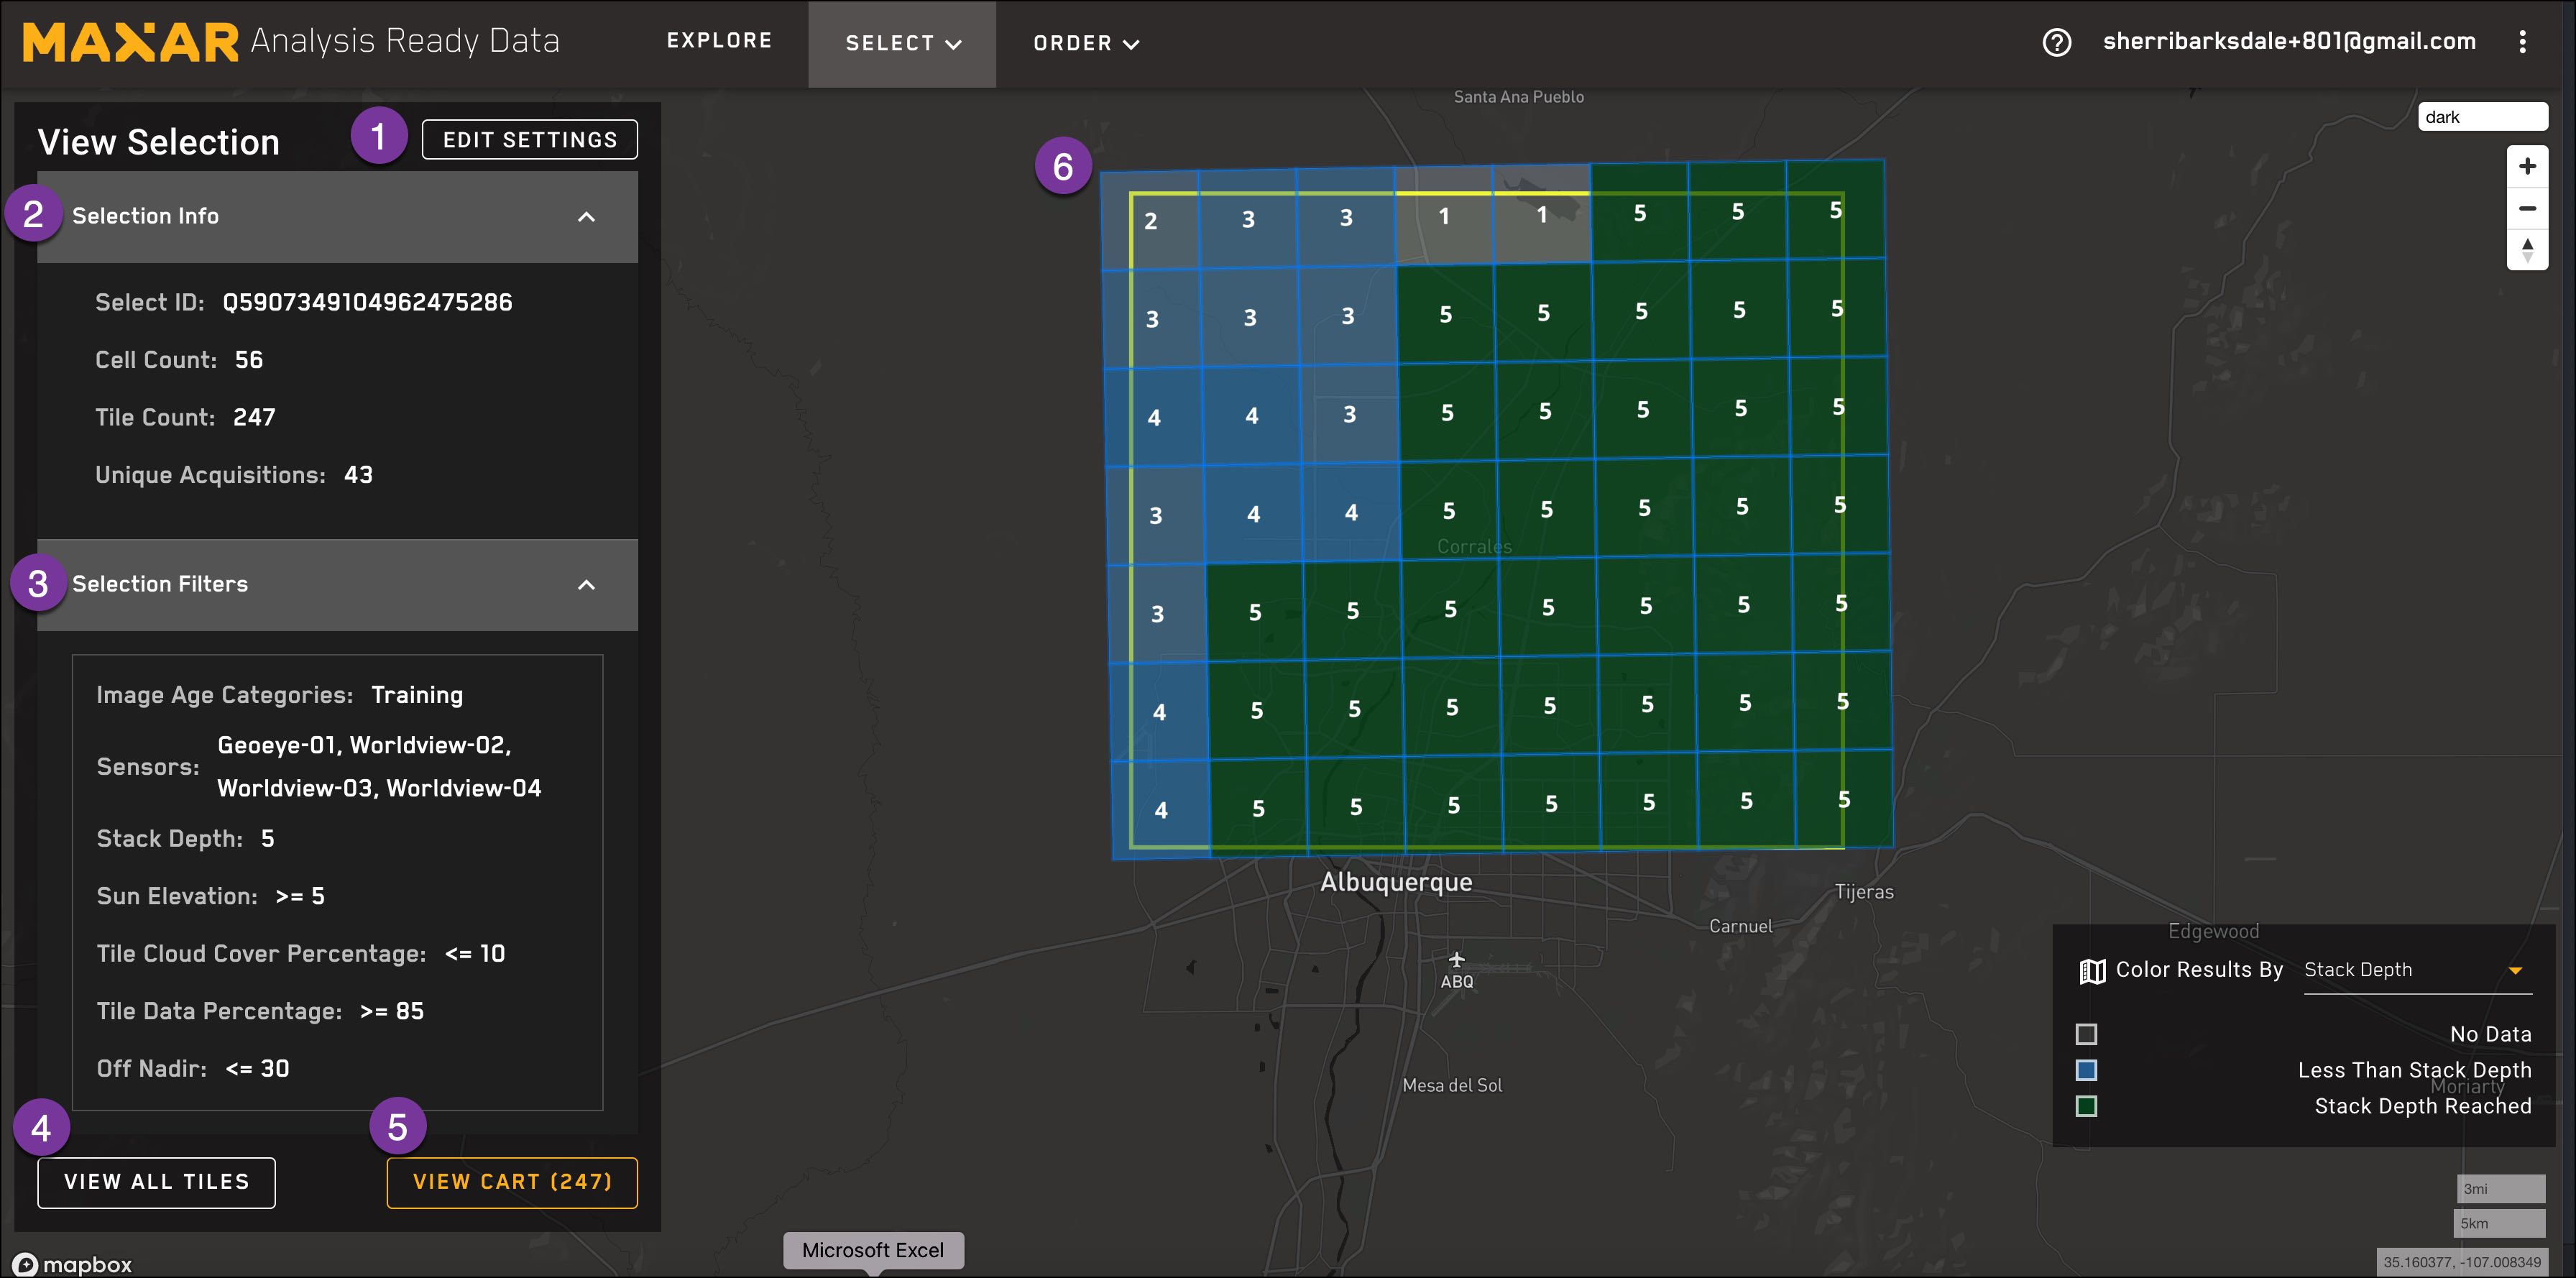
The numbers in this table correspond with the numbers on screen image above.
| Number | Field | Description |
|---|---|---|
| 1 | Edit Settings | Edit the selection criteria for the request. This creates a new selection with a unique select ID. |
| 2 | Select Info | Provides information about the selection and results. |
| 3 | Selection Filters | Shows the criteria used to find the selection results. |
| 4 | View All Tiles | Lets you view all the tiles in the selection results. |
| 5 | View Cart | Takes you to the ordering screen where you can order the selected imagery. |
| 6 | Grid Cells View | Shows the grid cells covered by the AOI, with a tile stack count for each cell. Click the cell to see the tiles within. |
Edit Settings
Click the "Edit Settings" button to change the values used to select imagery. Changing the selection criteria creates a new selection with a new select ID.
Select Info
This section shows the following information about the selection:
-
Select name (optional): If the selection was given a name, it will appear here.
-
Select ID: The unique ID assigned to the selection.
-
Cell Count: The number of cells covered by the AOI.
-
Tile Count: The total number of tiles in the selection results.
-
Unique Acquisitions: The number of unique acquisitions in the selection. Tiles are derived from these acquisitions.
Selection Filters
This section shows the chosen filters and values used to determine the selection results. If no values are set by the user, the default values are used and will be displayed here. Not all filters have default values.
View All Tiles
"View All Tiles" displays all of the tiles from the selection, and allows you to remove them from your cart before you place an order. You can also click the info icon to see the metadata for the tile.
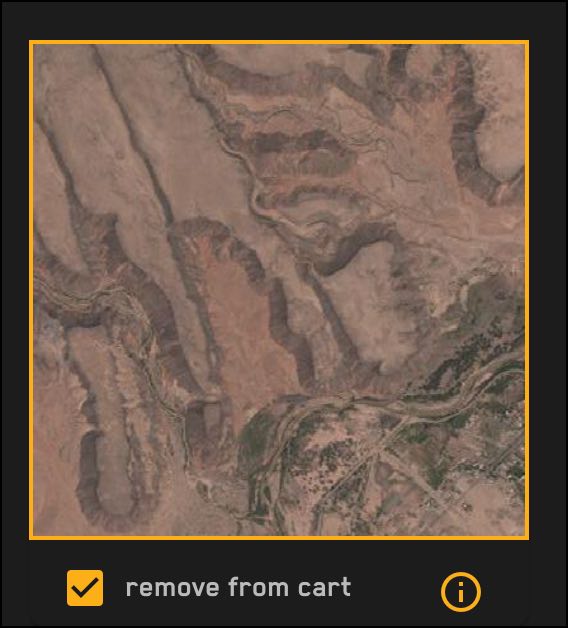
Remove a tile from your cart
When you make an imagery selection, all selected tiles are added to your cart.
To remove a tile from your cart, click the box next to "remove from cart" to uncheck it. The box will now appear blank and the text will say "add to cart".
Tile info
Click the "info" icon to display metadata about the tile.
-
Acquisition ID
-
Date collected
-
Cloud cover
-
Data coverage
-
Off-nadir angle
-
Sun elevation
-
Sensor
Additional actions
Using the buttons at the bottom of the "View All Tiles" screen, you can:
-
add all tiles to the cart
-
empty the cart
-
view the cart
By default, all tiles in the selection results are added to the cart. The "add all tiles to cart" button is grayed out to start. If items are removed from the cart, the option to add all tiles to cart will become available. If chosen, it will restore all previously removed tiles to the cart.
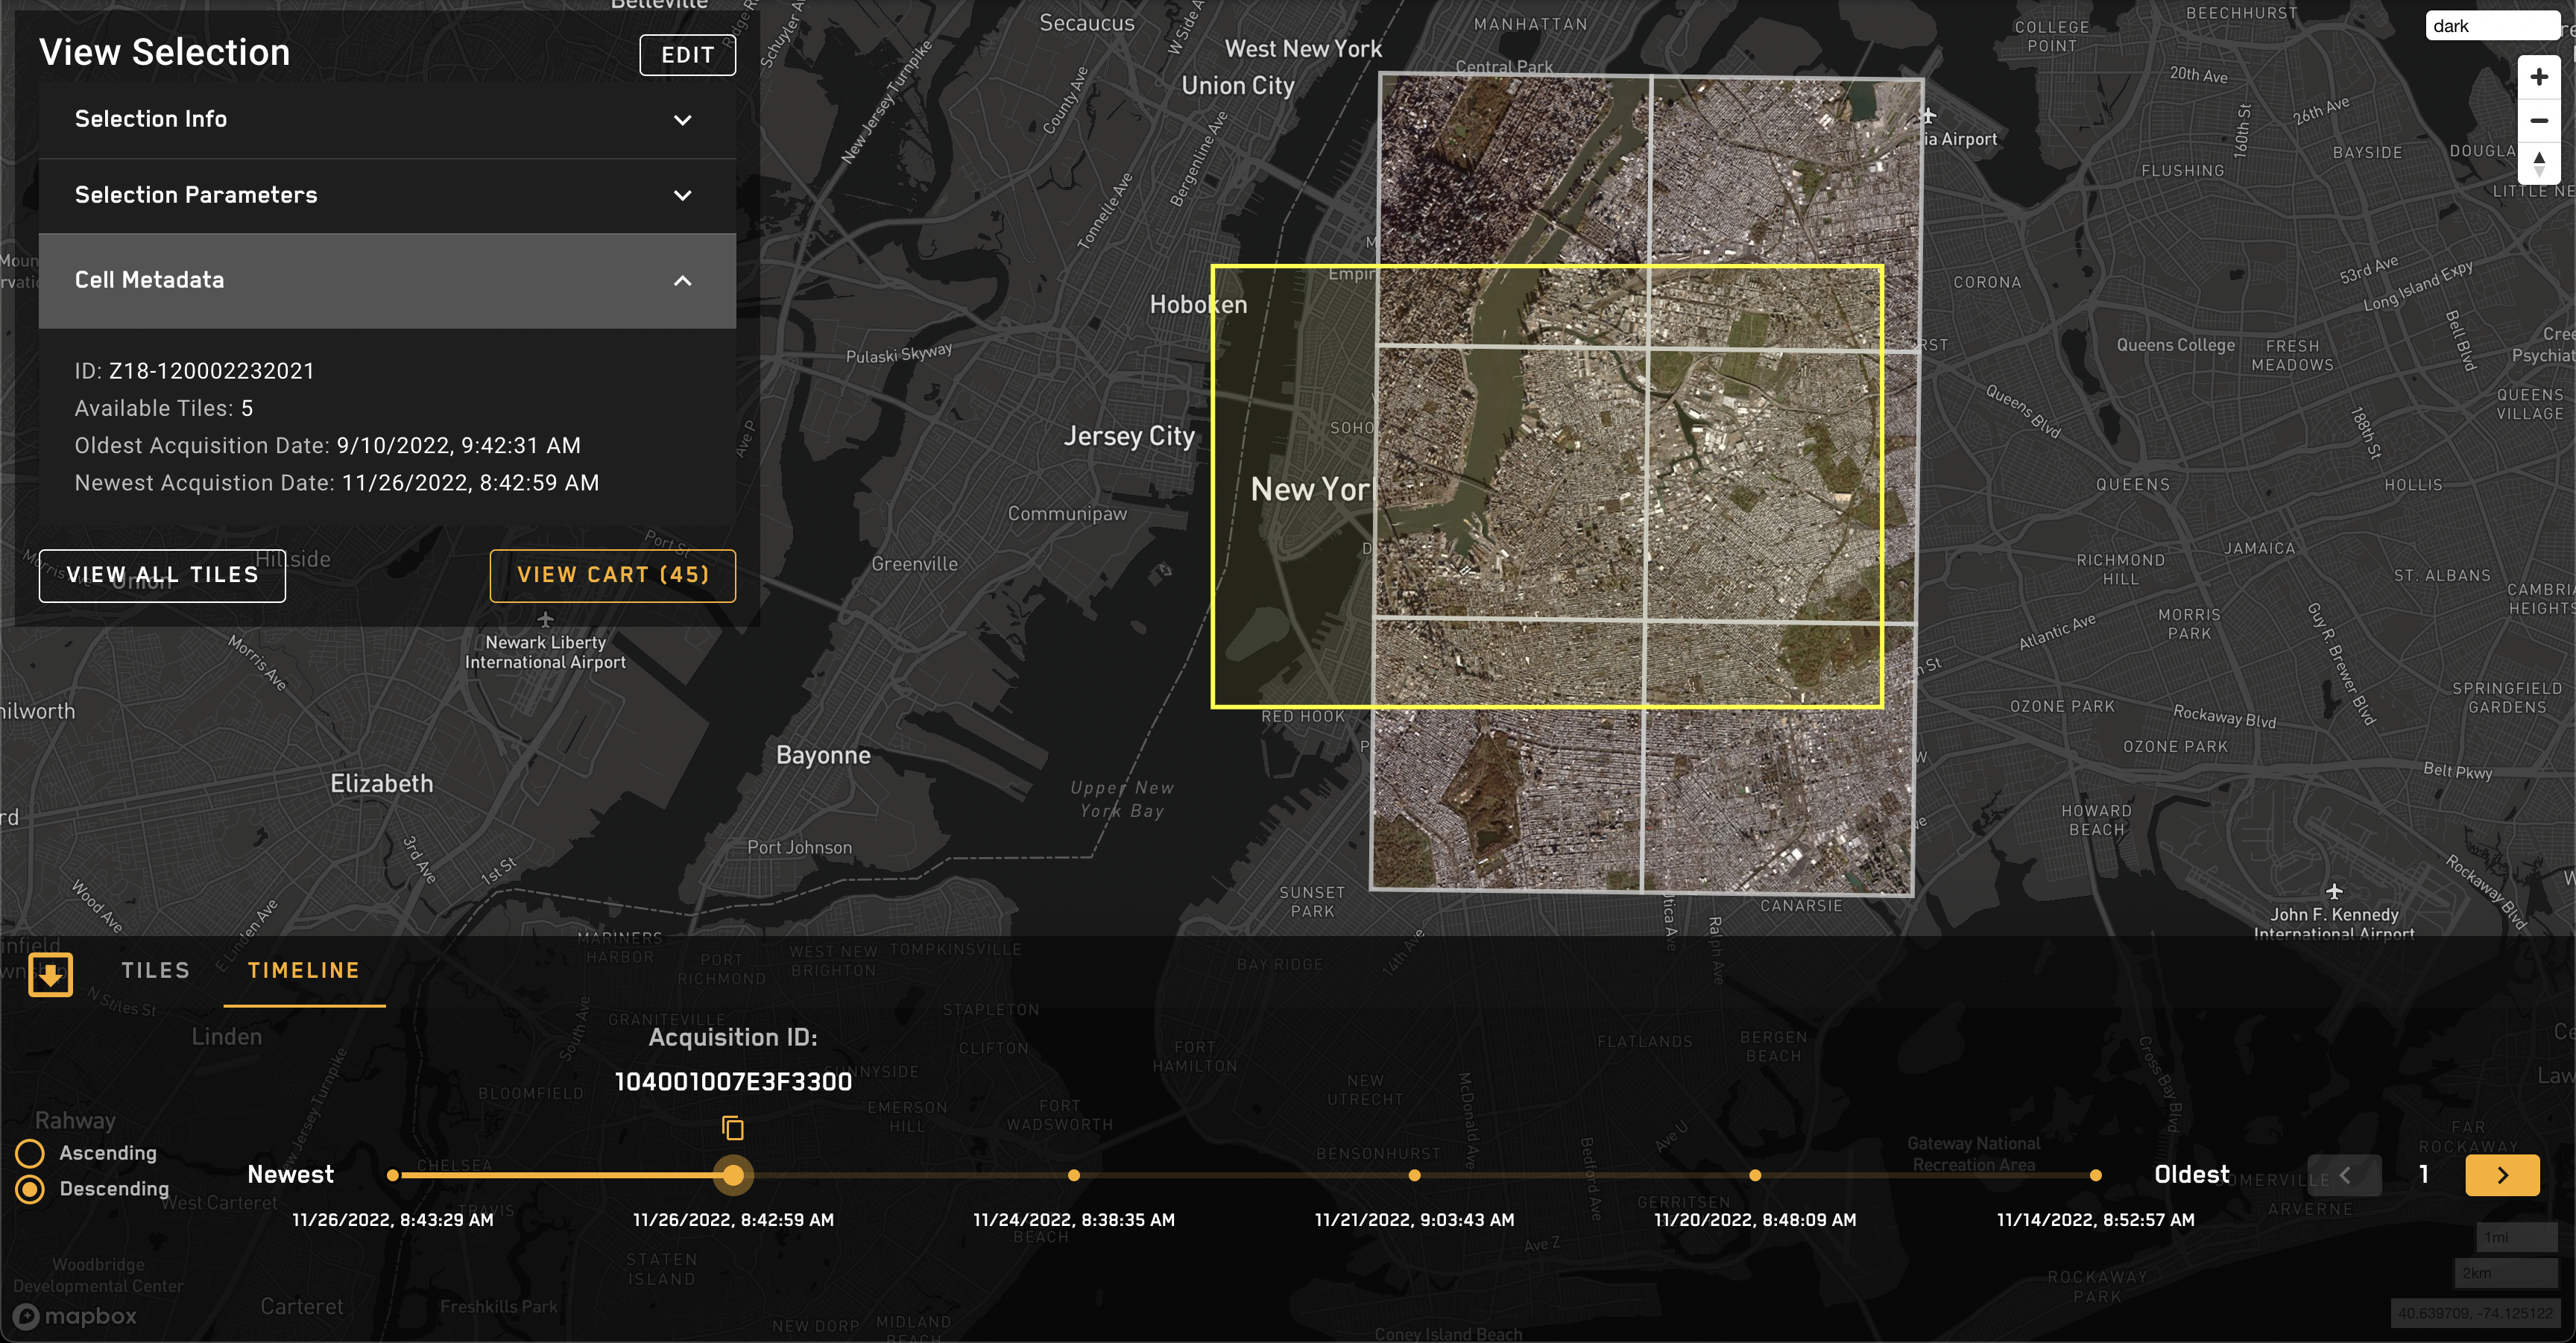
View Selection: Timeline View
As an added option, you may now view tiles through a timeline. You may enable this option by pressing the arrow in the bottom left corner of the screen, and selecting "timeline" in the top left of the window that will appear.
In timeline view, you will be able to parse images by acquisition ID over time for each cell in your AOI. This lets you quickly understand which acquisition IDs have the best data for your needs in your AOI. By default, timeline view shows you newest first, but you may change this by clicking "ascending" on the left side. On the right side, you may cycle through different acquisition IDs for your AOI by clicking the arrow keys.
View Cart
Choose the "View Cart" button to order the selected tiles. This button is available from the "View Selection" screen and from the "View All Tiles screen".
Learn how to Place an Order